
The guide
Everything your drives can do now.
MountDock is built for people whose work arrives on cards and drives — shoots, sessions, sample packs, render masters. This guide walks every capability in the context of the work, with step-by-step how-tos for anything that needs one.
On this page
Getting startedFan, grid, list & menu barFor photographersFor video editorsFor audio & musicEject All & the hotkeyAuto-eject & remountRename & eraseThe ignore listHistoryPreferencesTrial & licensingTroubleshootingStart here
Getting started
MountDock is a native macOS app — one small download, no account, no special permissions. The free trial runs 14 days with every feature enabled and asks for no card.
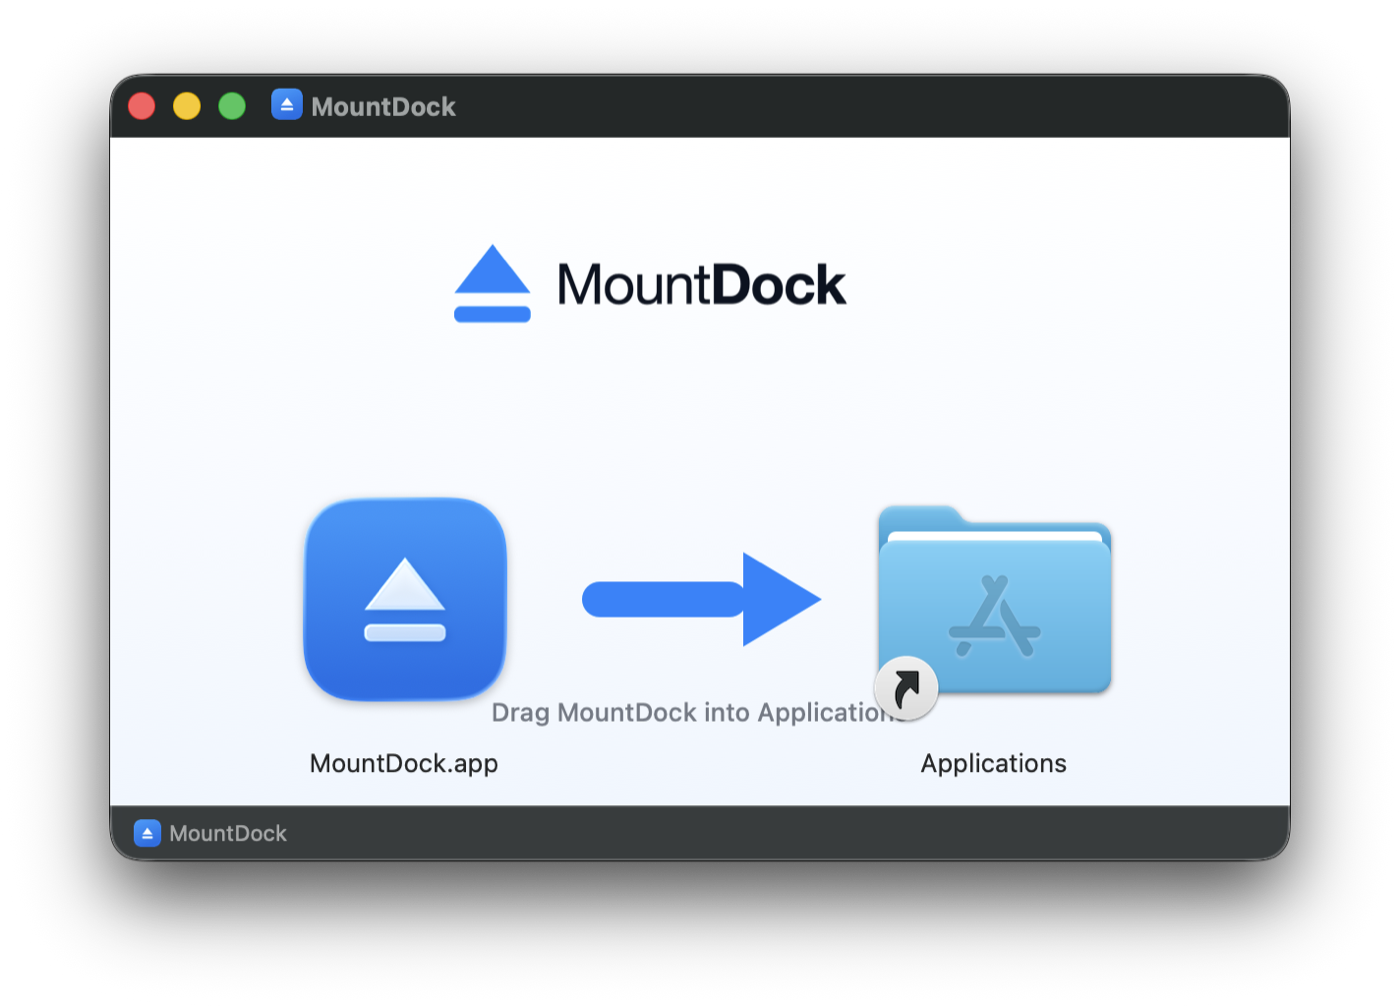
- Download the DMG and open it.
- Drag MountDock onto the Applications arrow in the installer window.
- Launch MountDock from Applications. The welcome screen starts your trial — and if macOS is showing the wrong language, the small picker in its corner fixes that on the spot.
- That’s it. Your drives are now in the menu bar and (optionally) the Dock.
MountDock never asks for macOS Accessibility or any other scary permission. If an app ever does, wonder why — this one just works.
Start here
Fan, grid, list & menu bar
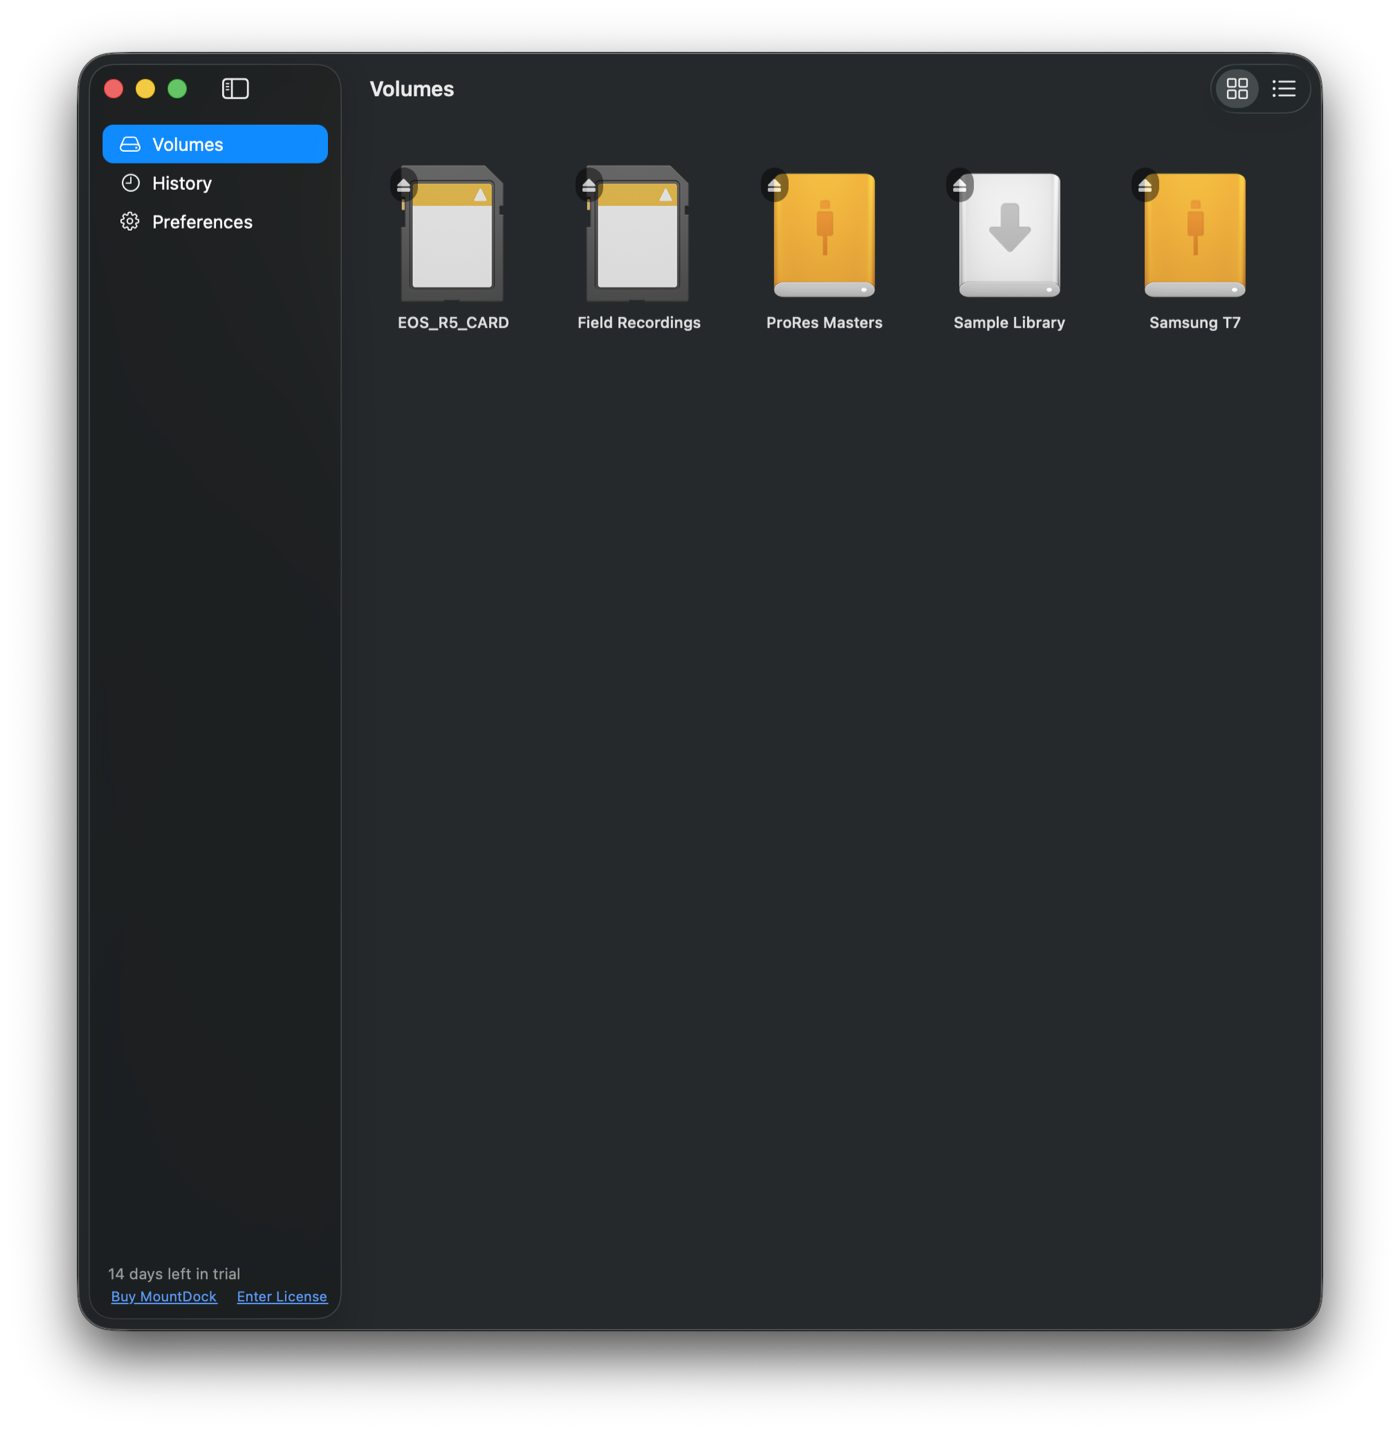
Your volumes live on two surfaces, both optional, both configurable in Preferences: a Dock icon that pops your drives out like a Finder stack, and a menu-bar itemthat’s always one click away. There’s also a full main window when you want the big picture.
The Dock fan
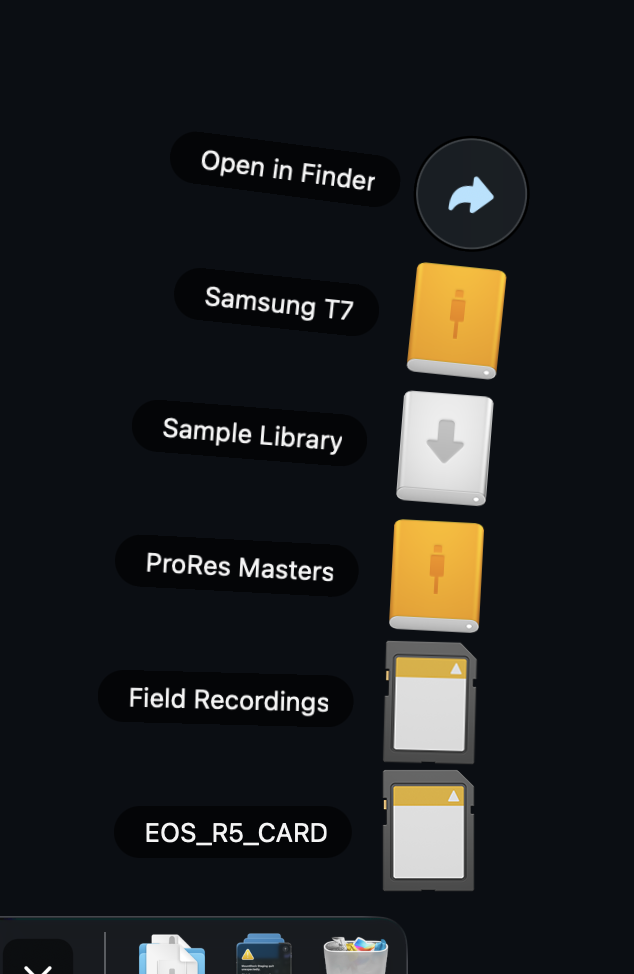
Click the Dock icon and your drives spring out in an arc — the fan macOS gives folders, finally given to volumes. Click a drive to open it in Finder; hover for the eject button; right-click for everything else.
Grid and list
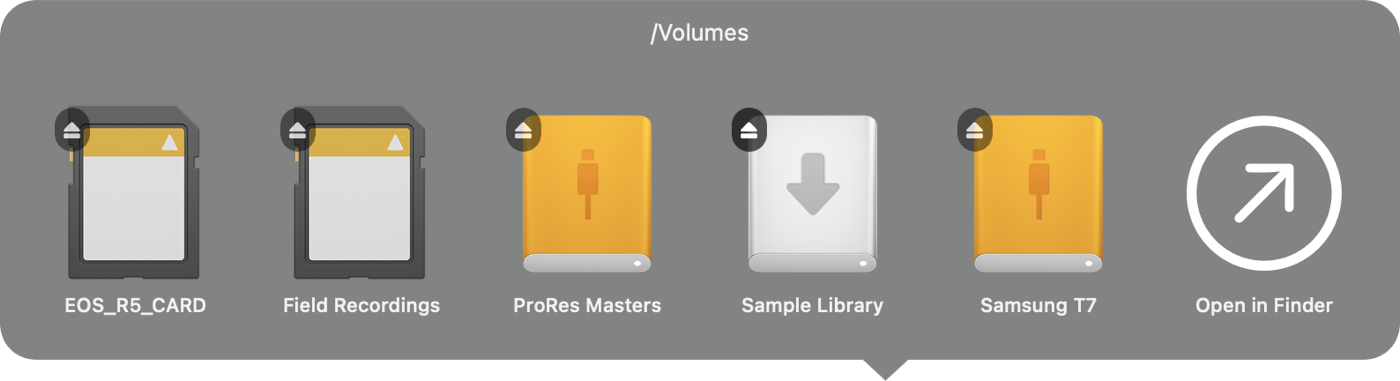
Prefer a panel? Right-click the Dock icon and choose View as Grid or List — or Automatic, which fans small sets and grids large ones. The grid shows capacity bars; the list is a compact menu, the way Apple would have drawn it.
The menu bar
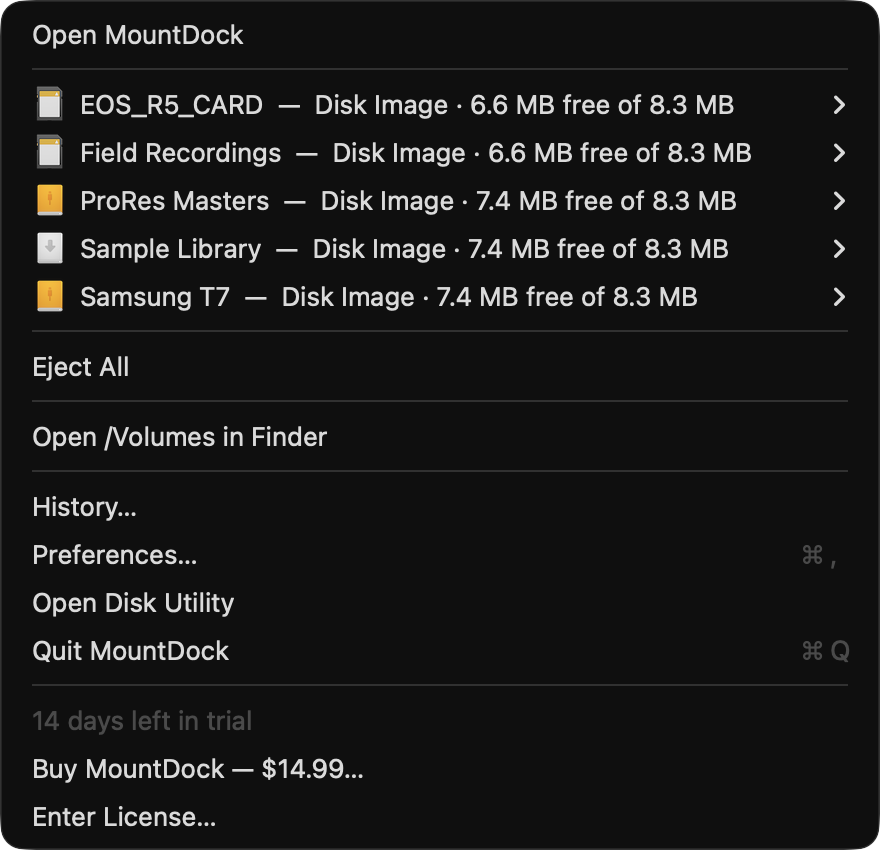
The menu-bar item lists every volume with its kind and free space, an eject affordance per row, and the trial/license status at the bottom. It works even if you turn the Dock icon off entirely.
The main window
Open MountDock (from either surface) opens the main window: volumes in grid or list (⌘1/⌘2), History, and Preferences in one Finder-style window.
Your workflow
For photographers
The card-offload loop — insert, import, eject, next card — is where MountDock earns its keep. Your card appears in the fan the moment the reader mounts it; when the import finishes, eject it without leaving your keyboard or hunting a tiny Finder sidebar button.
How to: the clean card loop
- Insert the card. It appears in the fan, menu bar, and Dock badge immediately.
- Import in Lightroom, Capture One, or Photos as usual. Watch the activity dot next to the card — while it pulses, data is still moving.
- When the dot goes quiet, eject from the fan (hover → eject) or press your Eject All hotkey.
- The card row greys out but stays visible until you pull it — so you always know what’s physically in the reader.
Never yank a busy card.The activity dot is read straight from the storage driver — if it’s pulsing, something is still writing, whatever the progress bar says.
Ejected ≠ gone
MountDock ejects the way Finder should have: the volume unmounts, but the device stays listed — greyed, with a Remount button — until you physically remove it. Changed your mind mid-shoot? Remount instead of reseating the card.
Your workflow
For video editors
Editors live on external SSDs — and NLEs love to keep files open. That’s the “disk in use” dialog that won’t tell you which app is the problem. MountDock will.
How to: force-eject with names, not guesses
- Eject the SSD like normal.
- If something is holding it, MountDock names the apps — “Final Cut Pro, QuickTime Player” — right in the dialog. No Activity Monitor safari.
- Quit the culprit and retry, or choose Force Eject and MountDock releases the disk anyway.
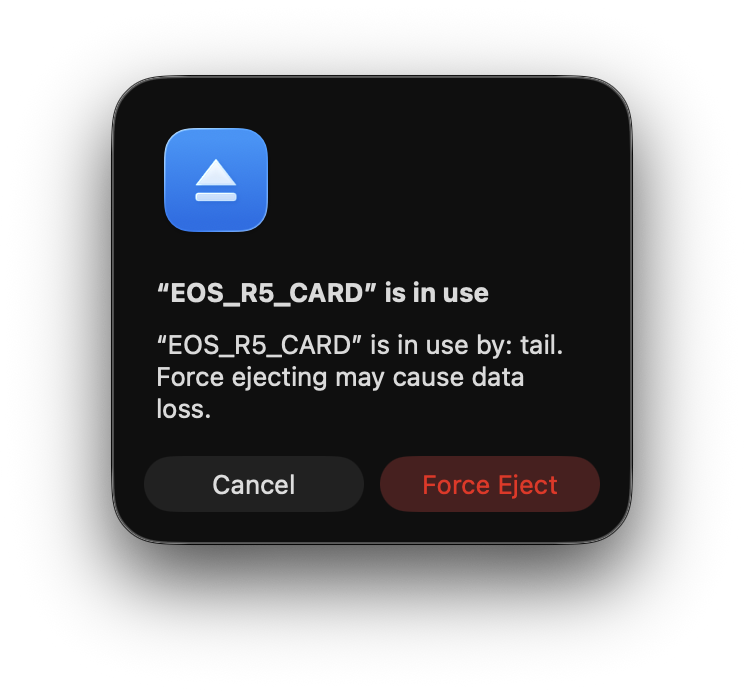
Force Eject is a scalpel, not a habit.If a render is mid-write, quitting the app first is always safer. MountDock tells you who to quit — that’s the point.
Shuttle drives between machines
With auto-eject on sleep on (see Auto-eject & remount), closing the lid cleanly unmounts your shuttle drive — grab it and go. Back at the desk, remount-on-wake brings everything back.
Your workflow
For audio & music
Sample libraries on one SSD, session files on another, a field recorder’s SD card in the reader — audio work is a small fleet of volumes. MountDock keeps the fleet visible, sorted, and safe to detach.
Protect the library drive
Your sample-library SSD should never be swept up by Eject All or auto-eject — Kontakt with a vanished library is a bad afternoon. Right-click the drive and choose Ignore in Auto-Eject & Eject All. It stays mounted through everything; ejecting it stays a deliberate, manual act.
Field recorder cards
Same loop as photo cards: watch the activity dot during the copy, eject from the fan, and the greyed row confirms what’s still physically inserted. History (see History) gives you a paper trail of every card that came and went during a session day.
Power moves
Eject All & the hotkey
End of the day: two SSDs, a card, and a Time Machine disk. Eject Allunmounts every removable in one motion — from the menu-bar menu, the Dock icon’s right-click menu, the File menu (⌥⌘E), or a system-wide hotkey that works from inside any app.
How to: record the global hotkey
- Open Preferences (from the menu bar or Dock menu).
- In Behavior, click the Eject All shortcut recorder.
- Press your combo — say ⌃⌥⌘E. Done. It now works from Premiere, Live, anywhere.
Eject All is surgical about what it touches: mounted removables only — never your boot disk, never network shares, never anything on the ignore list, and never a system-managed volume.
Power moves
Auto-eject & remount
Three optional triggers, all off by default, all in Preferences → Behavior:
- When the Mac sleeps — the lid-close, grab-and-go move.
- When the screen locks — for shared spaces and studio machines.
- After N minutes without disk activity — the tidy-desk timer.
Pair any of them with Remount auto-ejected volumes on wake and the drives come back by themselves when you return. The remount toggle only lights up once a trigger is on — it only ever remounts what auto-eject removed.
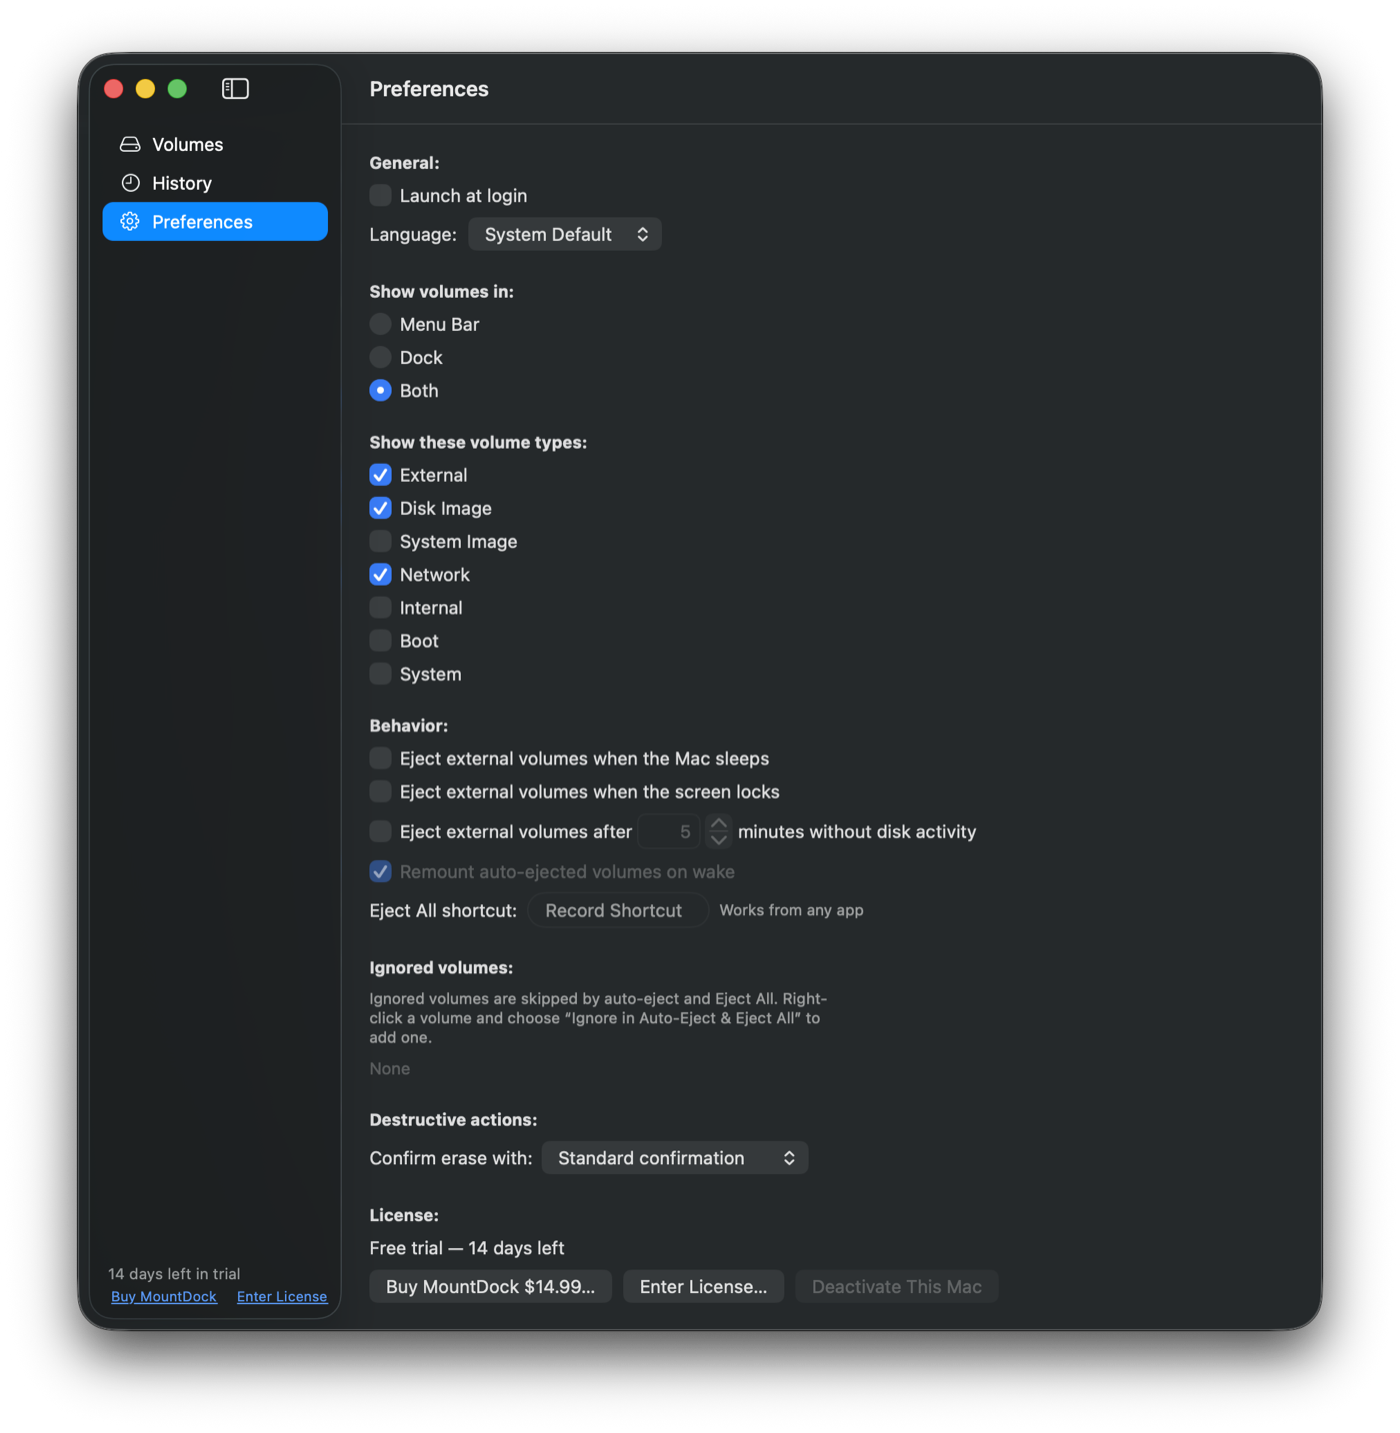
Volumes on the ignore list are exempt from every trigger — set your scratch disk once and forget it.
Power moves
Rename & erase
Card back from a shoot and named UNTITLED? Right-click any volume to Rename it in place. Need a clean card for tomorrow? Erase reformats it without a Disk Utility detour — external drives, cards, and disk images only; the eligibility rails make sure a system disk can never end up in the blast radius.
Pick your confirmation style
Erase is destructive, so you choose how hard it pushes back — in Preferences → Destructive actions:
- Standard confirmation — a normal alert.
- Type the volume name — the GitHub-style deliberate step.
- Hold to confirm — press and hold while the button fills.
- No confirmation (YOLO) — you know who you are.
Power moves
The ignore list
Some volumes should be immune to bulk actions: the sample library, the scratch disk, the backup target. Right-click → Ignore in Auto-Eject & Eject All adds a volume to the list; the same menu item (now checked) removes it. Manage the whole list under Preferences → Ignored volumes.
Ignored volumes are matched by their volume UUID — rename the drive, replug it, the exemption sticks.
Power moves
History
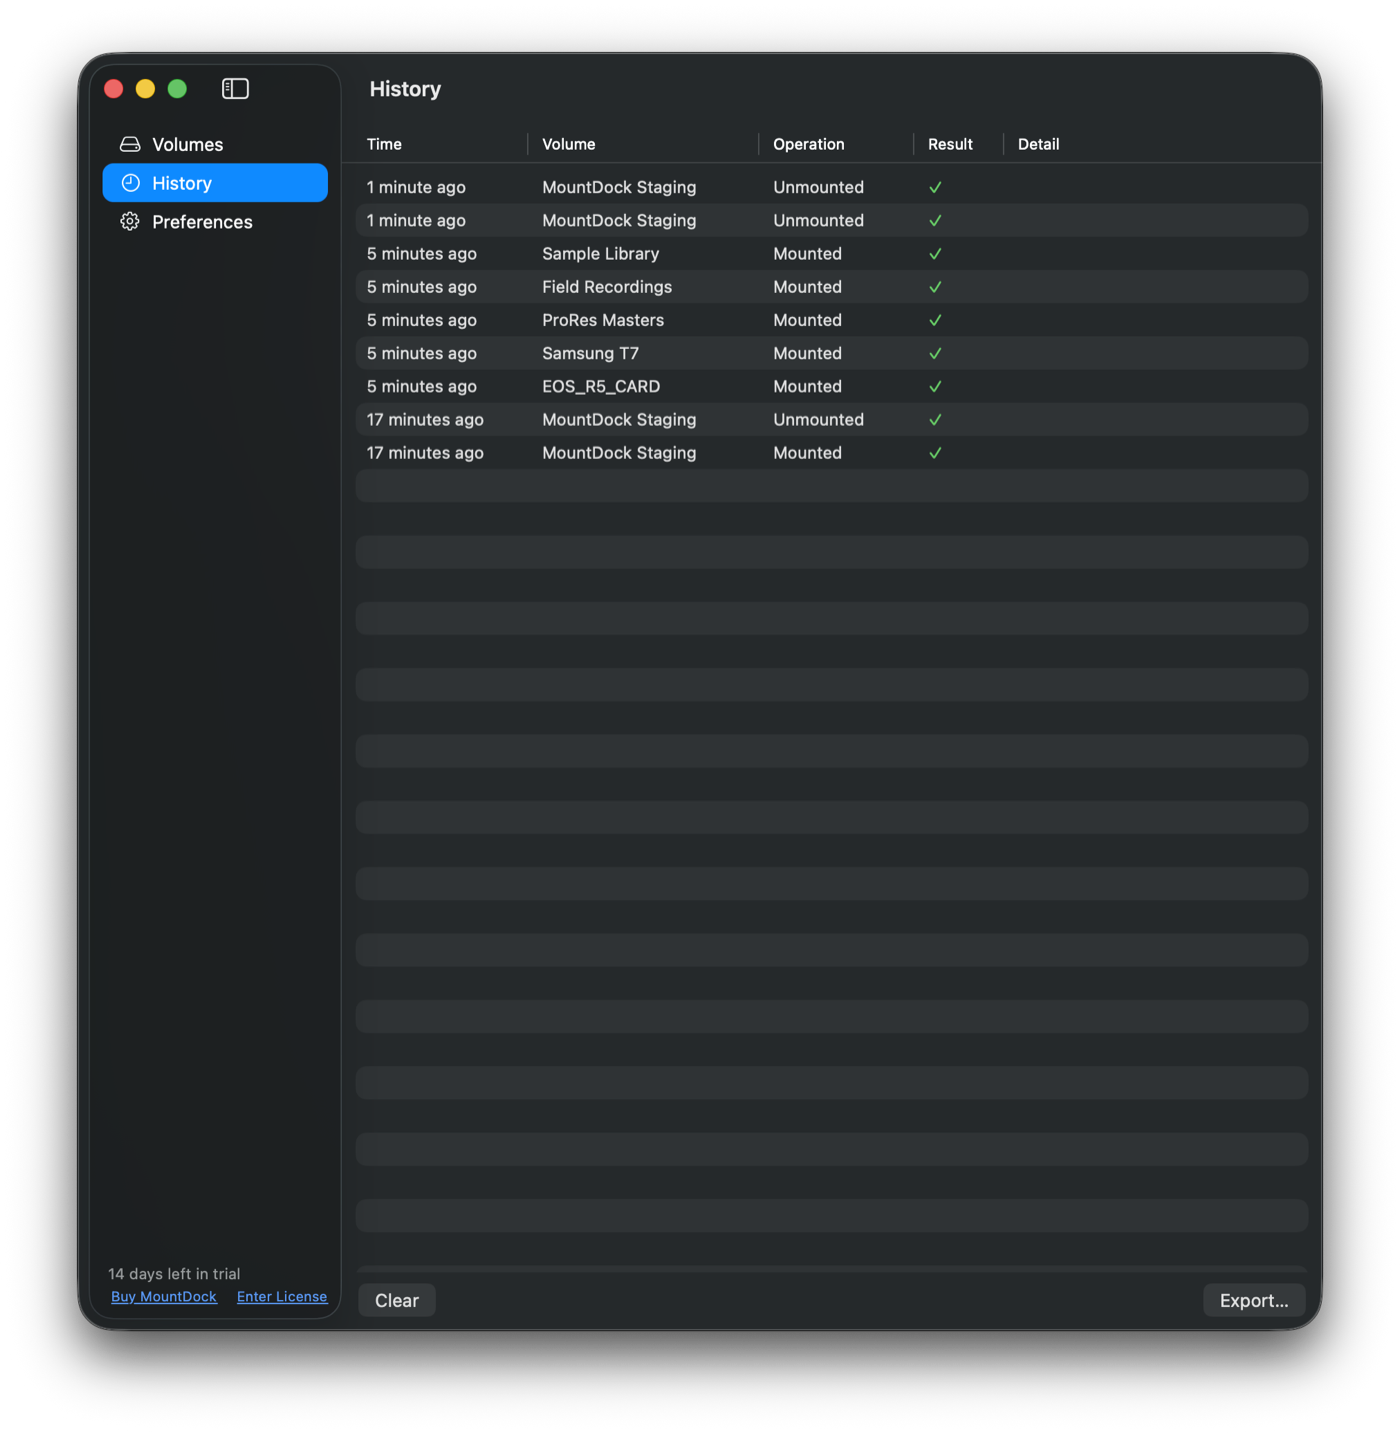
Every mount, unmount, eject, and erase is logged with its time, volume name, and device — a quiet paper trail. Which cards did we offload on Saturday? Did the backup disk actually mount last night? History knows.
Reference
Preferences
A quick map of everything configurable:
- General— launch at login (on by default), and the app’s language: System Default or English, Deutsch, Français, 日本語, Español. Your pick persists even if the system language changes.
- Show volumes in — Menu Bar, Dock, or both.
- Show these volume types — externals, disk images, network shares, internals, and (off by default) System Image: the simulator runtimes and OS-asset images macOS mounts for itself. MountDock hides that noise automatically; tick the box if you want to see it.
- Behavior — auto-eject triggers, remount on wake, the Eject All hotkey.
- Ignored volumes — the ignore list.
- Destructive actions — your erase confirmation style.
- License — status, seat management, deactivation.
Reference
Trial & licensing
The trial is 14 days, full-featured, no card, no account. When it ends, nothing is held hostage: you can still see every volume — eject, remount, rename, erase, and auto-eject are what a license unlocks.
One purchase ($14.99, one-time) covers 3 of your Macs. No subscription — the license is yours forever, and every 1.x update is included, delivered automatically. If a major 2.0 ever ships, it’ll be a separate, entirely optional purchase; your 1.x keeps working either way.
How to: activate
- Buy on the website. The thank-you page has an Activate MountDock button — click it and the app activates itself via a secure link.
- Or paste the key from your receipt: menu bar → Enter License…
- Moving Macs? Preferences → License → Deactivate frees the seat instantly.
Licenses validate offline — a signed token lives in your keychain. No phone-home on launch, no license server outage that can lock you out of your own drives.
Reference
Troubleshooting
“The disk is in use”
That’s not an error, that’s information — MountDock names the apps holding the disk. Quit them, or Force Eject if you’re sure. See the force-eject how-to.
A drive shows greyed out
Greyed means attached-but-unmounted: ejected safely, still physically plugged in. Click Remount to bring it back, or unplug it and the row disappears.
An ejected disk image lingers in Finder’s sidebar
MountDock fully detaches DMGs on eject — volume unmounted andbacking image released. If Finder still shows one, it was mounted by another app; eject it from MountDock and it’s gone for real.
Uninstalling
MountDock ships its own uninstaller — in the MountDock menu, choose Uninstall MountDock… It frees your license seat, removes its data, and moves the app to the Trash. No orphaned files, no ghost login items.
Accessibility
MountDock works with VoiceOver, full keyboard navigation, and Reduce Motion — the details live in the accessibility statement.
Stuck on something this page doesn’t cover? Write to support@mountdock.com — a human reads it.